Do you notice extra moisture, harmful air, or humidity in your bathroom? If you have noticed, there is a problem with the exhaust fan in your bathroom. It’s not working properly if the fan is dirty. Dirt may have accumulated inside it. In today’s article, I will give you a complete guide on how to clean Panasonic Bathroom exhaust fans.
If the exhaust fan is clogged or dirty, it can’t remove the polluted air, odor, and moisture inside. In that case, it is important to clean it up. Naturally, the bathroom continues to make an important contribution to our daily lives. That is to say, it is our daily necessity.
But if there is a bad smell or other polluted air in this bathroom, there is a problem. Exhaust fan plays an important role in eliminating this problem. So it is mandatory to clean this fan every few days.
13 Easiest Steps To Clean Bathroom Exhaust Fan Without Damaging
It’s common to get the bathroom exhaust vent fan unclean and clogged. Or even it affects the noise level and the airflow. Over time the fan gets louder and produces hot air. That’s why it is crucial to keep this fan clean and tidy.
Follow the step-by-step guide on how to clean Panasonic bathroom exhaust fans and finish the cleaning action effectively.
Step 1: Turn Off The Electric Power
The first thing is first. To start everything you want, you need to prepare yourself to protect yourself from any danger. So it is obligatory to remove or turn off any harmful objects related to the work. When you work with electrical problems, you need to disconnect wires, turn off the circuit breaker, and wear safety gear.
You should do it to ensure the utmost safety. However, I recommend turning off any electrical connection related to the exhaust fan to complete the job risk-free. Moreover, it helps you to get the job done with full confidence.
Step 2: Remove The Plastic Grille
The second and crucial thing is to remove the plastic grille or vent. You won’t be able to deep clean inside the fan unless you remove the vent. To get the job done, you need a brightly lit light, a ladder or tool, hand gloves, goggles, and a mask.
Remember, hand gloves should be made of plastic or rubber. Because plastic materials are insulators. And we know that the substances through which electricity does not flow are insulating substances. As a result, you can protect yourself from electrical shock.
However, to complete this process, you need to go through:
- Make sure you keep the chair or ladder on the flat surface to lessen the movement.
- Then, grab the sides of the plastic grill with both hands and slowly pull down. Never pull in such a way that it breaks. There are four iron or steel cords on each side.
- You have to compress these by hand very carefully. This will get them out of their place.
- Apply the same rule for pulling out the opposite part.
- After removing the cords or springs, gently and slowly. Finally, bring them down and keep them in a safe place.
Step 3: Disconnect The Clip
In the Panasonic exhaust fan, there is an LED light on the middle part. It gives light while removing dust and dirt from the bathroom. So there is a power cord connected to the fan. It goes into the unit that produces power. So you should disconnect the cord from the unit to make sure there is no power coming.
At this stage, you need to unclip the clip from the unit. You need to separate the clip with light pressure. Now the grille unit is out of the way. It means you, however, are ready to clean the vent cover or plastic mesh.
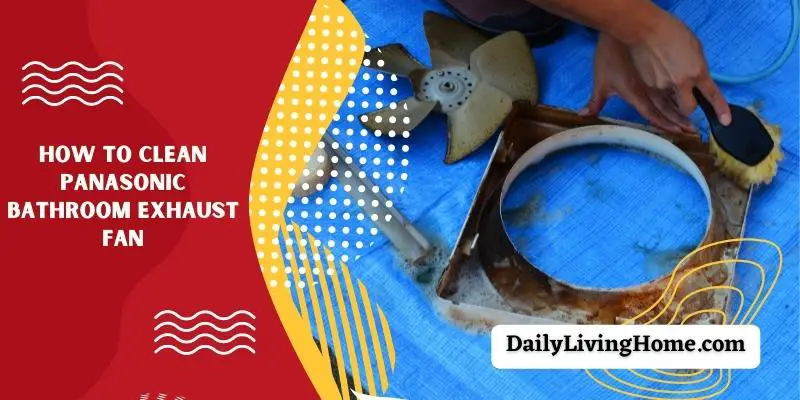
Step 4: Clean The Plastic Grille
After removing the plastic grille gently, now the cleaning process starts. You can clean the vent in many ways. Some ways are given below to get rid of the cleaning hassle.
Materials you need: a vacuum cleaner or air compressor, brush, liquid or dish soap or detergent, multi-surface cleaner, soft damp cloth, water, hand gloves, and face mask.
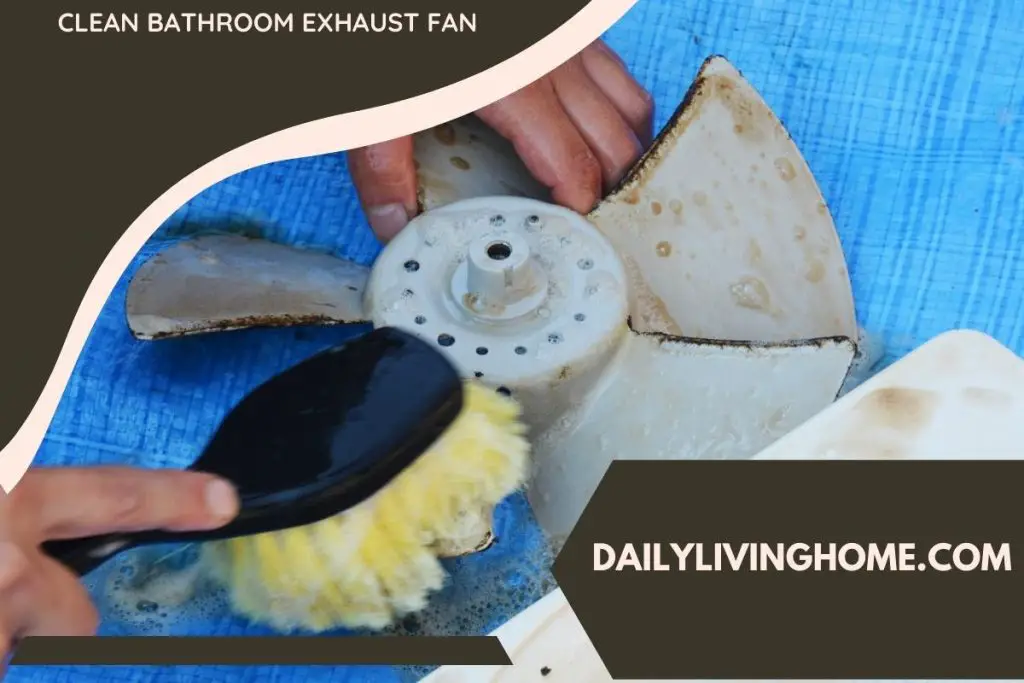
Way 1: Use Brush
Rub well with a large toothbrush or paintbrush. Keep in mind that it is better not to soak in water before rubbing with a brush. In this way, the external dirt or garbage will come up easily. You can use dishwashing lotion on the brush for better results.
Way 2: Use Dish Soap
Dish soap or liquid soap works incredibly better to remove the dust and dirt. Now, take a plastic bucket or pot and mix the dish soap with warm water. Rub the dirt area with a brush or damping cloth.
Way 3: Rinse The Grille
You can also clean by soaking the grille to remove duct and narrow space. You can rub the duct area or narrow area with a fine-toothed brush or grease.
Way 4: Use Air Compressor Or Stiff Bristle Brush
To clean deeply and remove all the nasty dirt from the vent, you can use an air compressor or stiff bristle brush. It works great to eradicate internal dirt.
Step 5: Separate The Electronics And The LED Light
In a Panasonic exhaust fan, there is a LED light in the middle. Sometimes it causes problems to clean deeply. In this case, you need to separate this light and carefully clean it. There is a screw over the plastic. You need to remove this with a screwdriver and get the light easily. Continue washing and brushing until it looks shiny and new.
Step 6: Set The Electronics
After cleaning the whole surface of the vent properly, set the LED light again. Before fixing the light and electronics, make sure the internal part of the vent is clean perfectly. Tighten the screw tightly so that the light adjusts at the exact place.
Step 7: Unplug The Fan From The Power Or Holder
Now, go to the main part. After finishing the cleaning process of the cover, apart from the fan from the power. To unplug the fan, follow these steps:
- First, go to the power supply unit or circuit breaker from your electrical panel.
- Remove the power to the fan by pushing the clip and pulling out that goes to the left side.
- There are 3 screws there on different sides. Loosen those screws gently with a screwdriver.
- After the screw gets loose, pull the fan downwards. Remember to hold the fan with your left hand. Else, there is a chance to fall.
- Remove the nuts or bolts, get the fan down safely and gently. Avoid pulling too hard. It is very firmly attached to the unit. So if you pull hard on the bottom, the wire or the plastic edge may break.
Step 8: Clean Inside Of The Fan
Once the fan is removed from the ceiling, it needs to be clean. It is the most time-consuming task. So you should be patient and persevere. Here you need an old toothbrush or paintbrush, bristle brush, and air compressor. Follow these steps to get the job done.
- Remove the motor that is located on the downside of the unit. This will help you to clean the inner side smoothly.
- Wipe the squirrel cage with a soft dampen cloth. You can use a brush and compressor to rub the internal part.
- Next, take out the main part and take off the middle-side nut with a 12mm heavy-duty screw. Turn the screw anti-clockwise to loosen it.
- Then, take off the squirrel cage from the motor and electronics.
- Dip the cage into the soapy water and scrub harder with a brush.
- You can use a cotton bud to clean the mesh profoundly.
Pro Tips
You can use vacuum attachment or brush attachment to eradicate hassle to remove the fan from the housing. It is very effective to remove the entire dust.
Step 9: Remove The Motor
By removing the motor from the fan, you can clean it hassle-free and properly. Also, it ensures less damage and keeps you free from hazards. However, here you need a magnetic tip screwdriver for better results.
- Loosen up the screws (most probably there are 5 screws) and pull them out.
- Separate the motor and electronics from the mesh cover.
- Soak the mesh into the soapy water and scrub hard with your old toothbrush.
- After washing the mesh cover, wash the motor and electronics area.
- Re-screwed the mesh cover with motor and electronics and keep it aside. Make sure to connect the wire in the right position and secure the nuts in their place.
Step 10: Clean The Fan Box
This time, you need to go to the box where the fan is attached. Here you can use a vacuum cleaner or air compressor. Also, you can use dampened microfiber cloth or brush. To clean the narrow area, you should use an air compressor. Vacuum attachment works great to wash out the dust and garbage inside. After the garbage gets loosened, wipe down the inner area of the housing with microfiber or cotton cloth.
Step 11: Reassemble The Fan
Once the cleaning process is done, you are at the finish line. But yet, there is something you need to finish. Reinstalling the fan in its house perfectly is crucial. Take the fan and put it gently in its place. Make sure you connect the wire and clip at the right plug or socket.
Secure the nuts or bolts with a magnetic screwdriver. During screw settings, hold and push the fan ups with your other hand to secure tightly. It’s better to use an electrical screw for better results.
Step 12: Make Sure The Fan Running Smoothly
Now it’s time to see if the fan is running properly. If the fan gives the right air and there is no sound while running, it must be understood that the fan is well set. Keep the fan on for a while and watch.
I recommend continuing for 10 to 15 minutes to see if it smells bad or if the hot air is emitted properly. It’s really effective in verifying accuracy.
Step 13: Set The Plastic Grille Or Vent
Your work is almost finished. Now it’s your turn to fit your plastic grill properly. Extend the 4-iron springs and set them in the right place. Shake with your hands to see if the grill is moving. If you see no movement, your work is done.
6 Big Benefits Of Cleaning Your Bathroom Exhaust Fans:
It is difficult to express the benefits and necessities of cleaning the air vent fan in the bathroom in words. Everything needs proper supervision. Exhaust fan is no exception. It is mandatory to clean it after 1 or 2 years. Here I have tried to highlight some of the significant benefits.
1. Extend The Fan’s Life
If you clean your bathroom fan every few days or months, its lifespan will be greatly increased. For example, once you have installed it and don’t clean it in 2-3 years. In this way, the fan will lose its own individuality. And it won’t provide the utmost performance even lower than the average.
Rather it will cause you annoyance. It will increase rather than expel hot air and odors. Also, gradually its motor will be damaged and at some point, it will break down forever. So if you want to get optimum performance for a long time, cleaning and maintaining the exhaust fan surely.
2. Bad Odor-Free Environment
One of the main functions of an exhaust fan is to eliminate odors. It is normal to have a bad smell in the bathroom. There is no way to deny it. This stench often harms our health. And it causes other fatal diseases of the stomach.
But the good thing is that the exhaust fan has been playing an impeccable role here. It helps to keep the bathroom odor-free by removing various dust, dirt, and moisture from the bathroom. This will allow you to have a good time in the bathroom.
3. Remove Moisture And Damping
Who likes to be in the bathroom clean and slippery? I don’t think anyone likes it, right? However, there is no substitute for an exhaust fan in the bathroom to solve this problem. As well as removing odors, it also keeps the bathroom dry and free from dirt and grime.
This keeps your bathroom dry and less slippery. What are the benefits? The advantage is that you will fall asleep and get rid of the severe pain. Moreover, it is also effective in keeping the bathroom clean.
4. Prevent Mold And Mildew
Not only is it resistant to dirt but it is also resistant to all types of fungi and some bacteria. This ensures the bathroom’s safe and germ-free. It acts as an antibacterial agent. This prevents mold and mildew from reproducing.
This prevents the bathroom from getting wet quickly. Mold and mildew aren’t safe for humans. It causes disease and makes you feel broody.
5. Keep The Environment Clean
It is essential to keep the environment free from pollution. Although, in many ways, the environment is being polluted now. Since we are talking about the bathroom environment, let’s see how to keep the bathroom environment pollution-free.
The exhaust fan can easily flush out water, steam, dust, odors, hair, moisture, and other harmful germs that have accumulated in the bathroom. It keeps the bathroom environment healthy and clean by absorbing. However, the prerequisite is to take proper care of the fan and clean it every few months.
6. Save Your Valuable Money
It is not possible for many to change the exhaust fan after a few days. Or, even if it is possible, it is expensive and time-consuming. And there is trouble with it as a bonus. But this problem can be overcome with a little awareness. If you clean it after a few days, it will give good results for a long time. And by doing so, your money will be saved as well as trouble.
What Should You Consider While Cleaning Bathroom And Beyond Exhaust Fans
There are a few things you need to consider before you plan to do anything. There are a few things to keep in mind when planning to clean an exhaust fan. These are the topics discussed in this section.
- Gather All Equipment
Gathering all the important accessories is key. If you don’t have enough materials, you can’t get the job done perfectly. So collects and accumulates the mandatory hardware to complete cleaning tasks properly and accurately. You can’t complete the work without the needed materials.
- Ensure Safety
Safety is another crucial consideration while working with electrical parts. Since exhaust fans are related to electricity, you must start working with full preparation. All connections to electricity must be disconnected before work can begin. Because no one wants to feel an electric shock. So my advice is to turn off all electrical connections with the fan.
- Take Advice From Experts
You have to accept that you can never act as an expert. In this case, I suggest starting the work knowing the whole process from an experienced person. It will be beneficial and will be able to protect yourself from various harms.
Frequently Asked Questions (FAQs):
Does It Add Any Value To Cleaning The Exhaust Fan In the Bathroom?
Undoubtedly, it adds a great value. Bathroom exhaust fans play a vital role to remove dirt, dust, and garbage from the toilet. It exits the bad odors and vapor as well to keep the bathroom temperate.
It eradicates hot air and makes the room temperature temperate even on summer days. So it’s obligatory to clean and maintain your bathroom exhaust fan on a regular basis.
How Often Do You Need To Clean A Bathroom Exhaust Fan?
It depends on the quality and efficiency of the bathroom exhaust fan. High-efficient and quality fans like Panasonic Exhaust fans need to be cleaned after 1.5 to 2 years. But the average duration is 1 year. It’s better and less time-consuming to clean your exhaust fan after 1 year. In such a way, the fan accumulates less dirt and dust.
Experts recommend and I also, make sure you clean your exhaust fan at least once a year. If the fan is cleaned after every year, it works great and provides the best service.
Final Touch
Cleaning and refreshing your entire house make you feel happy. But there are some areas where you can’t clean easily. Bathroom exhaust fan plays a significant role to keep the bathroom oil-free, germ-free, bad odors-free, moisture-free, and mold-free.
But a bad exhaust fan can’t perform well. This is why after 1 or 2 years, it’s important to clean it. If you install a Panasonic Exhaust fan and if it works less efficiently, you need to clean it immediately. To keep you in mind, I’ve described a useful guide on how to clean Panasonic bathroom exhaust fans step-by-step.